“Version Control”
The ultimate boon for software engineers! Why? Suppose you have a demo scheduled with your client. You are a hardworking programmer, just like me, and you successfully complete the functionality well in time for the demo. Everything is fine, dandy! Until you decide to play with the code, doing a code review yourself, beautifying and rectifying the bugs within. Minutes before the demo and you finish the code review fixes as well; kudos, good going mate!!! Now you get a cup of coffee and rehearse the demo, already playing how smoothly it would go. Here comes your worst nightmare live in action, the code has broken! In reality, the rectification process ended up being a disaster and that too minutes before the demo! Say goodbye to coffee and peace, you will be left scratching your head to find out what went wrong! Safe to say that your client ain’t going to be too gung-ho about it!
This is where Version Control comes to your rescue, like a knight in shining armor, just like those superhero movies! With version control, incremental versions of the files are stored, so that in times of desperate measures such as this, you can quickly switch to one of the previous versions and turn everything back to normal; almost like a piece of magic!!! And the magic does not stop here. With advanced version control tools such as Github, BitBucket and Apache Subversion (SVN), you can even sync your local files with the cloud so that you can quickly access them even if you are on the go or do not have access to your machine. Amazing, isn’t it?
One of the most popular methods of version control is Github. In a few simple steps, I’ll show you how you can set-up version control using Github and say goodbye to all last minute glitches.
What you need
- A Github account, which you can create for free at https://github.com/join
- Git shell which you can download and install on your machine from https://git-scm.com/downloads
Let’s get it rolling!
Step 1: Initializing a Repository
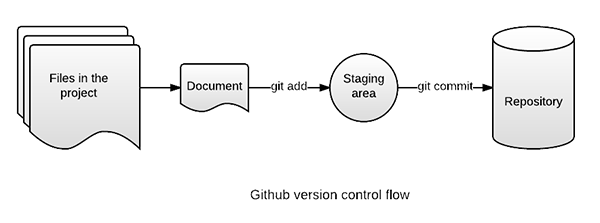
A repository or simply a repo is a common storage place for all the documents in the version control system. It maintains the version for every file that you have added to it.To initialize the repository, you need to use the git init command.

This would initialize an empty repository in the folder you are currently working on.
Step 2: Adding files to the Repository
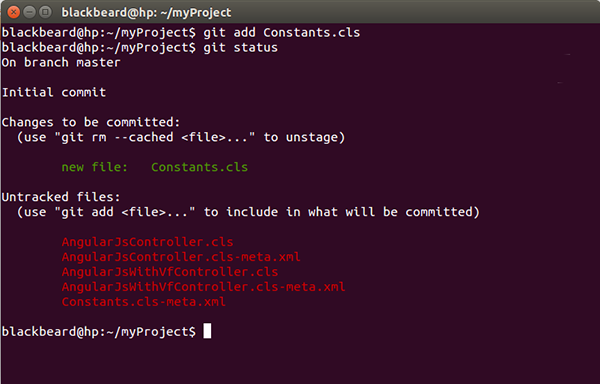
The next step is to add the files to the repository in order to maintain versions. It is necessary to specify the files whose versions you need to maintain to git. You need to use the git add * command for the same. The ‘*’ specifies that every file in the current folder is to be added to the repo. You can also mention the names of the files that you want to keep a track of. Suppose you want to track the file Constants.cls only, the command would now need to say git add Constants.clsYou can also view the status of the files in the repo by running the git status command.
Github has its own way of recording the changes to the files. Once you have added the files to track, it stores the files in a staging area where all the changes to the file are recorded as snapshots.
Now that you have successfully added files to your repository, the version control system is up and running and already has started tracking the changes you save to your files.
Step 3: Committing the changes
What is the use of only tracking the changes to the file and not saving them? Committing the changes ensures that every change that you did prior to the commit has been recorded and stored on the version control system.If you are likely to make mistakes, committing your files is the way to stay safe.
git commit -m <commit_message> command does the trick for you. The arguments -m <commit_message> are used to record the commit messages. Commit messages are a way to document the changes done in the current version of the files.
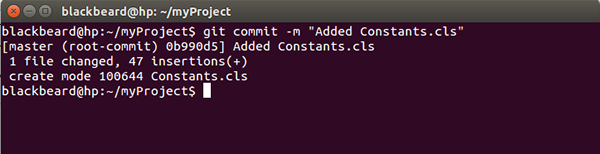
As a cardinal rule, it is always a good practice to add meaningful commit messages. In case you need to revert back to a previous version of the file, it’s a lot easier to identify the version from its commit message.
What next?
Now that you have set-up version control using Github, you can have that cup of coffee even if the recent changes affect your code negatively. The only thing that you need is to revert back to the commit where everything was working as expected. In order to do that, git checkout -- <file_name> is the command for you. This would return the specified file to the previous version and discard all the uncommitted changes.But it all comes at a cost…
- Though Github allows you to create a free repo, it remains public; which means anyone can view your files and their revisions when stored on the server. But worry not, if you want a private repository, you can just purchase it. Or you can also switch to other service providers such as BitBucket, which allows you to create a private repo with a single user.
- Uncommitted changes once lost, are lost forever
- Storing large amount of data on the cloud is not very efficient as it takes a lot of data and resources to publish a file or to download it
- As the number of users increase for your private repo, the cost also increases
It doesn’t stop right here though…
There is a lot more to explore in the git world, such as branches, pulls, merging, pull requests etc. Things that make software development a lot easier and collaborative. You can find the online tutorials at https://guides.github.com and make software development easier and more collaborative for yourself and those around you!But make sure you commit your files before you get started with those tutorials, because you know it too well now “A commit in time, saves hours nine!!!”
References
Written by Saket Joshi, Salesforce Developer at Eternus Solutions
No comments:
Post a Comment